

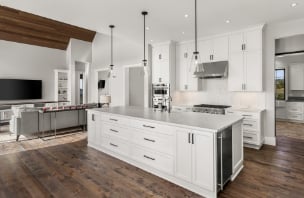
Hardwood floors offer your home a clean and modern appearance. If your hardwood floors have undergone some wear and tear over the years, it may be time to upgrade them. Instead of replacing them altogether, though, you could change the color of your hardwood floors by staining, refinishing or painting them.
Before you change the wood floor color, consider the color you want and what type of wood you have. Some hardwood floors need special treatment, so coloring them certain ways could damage them.
How to Change Hardwood Floor Color
When changing your hardwood floor color, you have several options. The first step is deciding whether you want a light or dark color. Then, explore which coloring options work for your floor’s material.
1. Choose a New Floor Color
Here are some tips for choosing a new color for your hardwood floors:
- Use light colors in smaller rooms: Maple, oak and pine are light types of wood. These species of wood are easier to clean and less likely to show dirt and scratches than dark wood species. Pale, light colors — like beige and off-white — make the room look larger as well, and they also tend to match more decor. Natural color, or no stain, is a popular light hardwood option for homeowners, too.
- Dark colors add elegance: Eco-friendly dark wood has become the popular choice for hardwood flooring today. Dark-colored wood tends to last longer than light wood — due to its ability to absorb sunlight, dark wood suffers less from sun damage. Dark-colored wood is especially popular in kitchens and bathrooms. If you want a dark floor without the appearance of scratches and dirt, you can apply a satin finish that hides imperfections in the wood. To prolong the life of your dark hardwood floors, you also could clean your floors more often and ask guests to take their shoes off when they come over.
- Consider the sunlight: If you have hardwood flooring in a room that has a lot of natural light, talk to a flooring specialist. UV light could damage some types of wood, while it could lighten or darken others. If you want a specific color for your floor, you could also use window treatments to limit sun exposure.
- Take samples home: When you go to the home improvement store, take some color samples home to compare. You want to know how the color looks before you change the whole color of your floor. Put the color samples next to furniture and walls to see how the flooring matches the decor. What looks like the right color at the store may clash with your furniture at home.
2. Completely Clean the Floors
Before you change the color of your hardwood floors, make sure your floors are completely clean. Remove the following items from the room:
- Furniture: Remove all furniture and rugs from the room. The wet stain finish could damage your furniture.
- Doors: Taking the doors off of their hinges before staining the floors allows you to have a smooth surface to sand the floor.
- Floor molding: Take the floor or baseboard molding off of the bottom of your walls. You want to have a smooth surface for when you sand the floors.
- Nails or staples: If you are transitioning from a carpet to a hardwood floor, make sure you get rid of all the staples that held down the carpet. Staples could ruin the integrity of the sandpaper you use. Drive nails into your hardwood floors so that you have a smooth surface. Removing the nails from your hardwood floors will leave holes in your floor panels.
You should also place a sheet of plastic over the windows, vents, registers and doorways. Sanding the floor could get dusty, so you don’t want to make more work for yourself later.
3. Sand the Floors
Use a random orbital sander to sand your hardwood floors. Sanding equipment that moves in random directions won’t make directional scratches on your floors. Sand the floor three times, using three different types of sandpaper — coarse grit, medium grit and fine grit:
- Start sanding right away: Leaving the sanding equipment in one spot for too long could damage your hardwood floors. Once the sander is on, move the machine along the grain of your wood panels.
- Sand the center of the floor: When you make it to the other end of the room, overlap the path where you sanded to keep an even surface. Get as close to the edges of the room as you can.
- Sand the edges and corners: A handheld sander could help you sand the floor’s edges. Use a detail sander in the corners of your floor. Make sure the sandpaper you use is the same grit as the kind you used for the random orbital sander.
- Clean up dust and debris: Use a vacuum with a brush attachment or a broom. After the third sanding, use a wet mop to clean up the debris. Make sure you get rid of all debris and moisture on the floor before you stain the floors.
- Buff the floors for a smooth surface: If your floors are rough after sanding them, buff the floors with a sanding screen.
Sanding the floors alone will change the color of your floors. If you choose not to stain your floors, apply a polyurethane finish to strengthen the integrity of your floors.
4. Stain the Floors
After you’ve finished sanding, remove the plastic film off your windows, vents and doorways. Polyurethane has a strong odor, so make sure the room is properly ventilated:
- Mix the polyurethane finish thoroughly.
- Use a bristle brush to add a smooth layer of finish to the edges of your floor.
- Add a smooth layer of finish to the center of your floor with the applicator.
After the refinished hardwood floors have dried, you can return the furniture, molding and doors to the room.
5. Paint the Floor
Painting hardwood floors is a unique and creative option that can give your floor and space an entirely new look. If you do decide to paint your floor, try using a true floor or deck paint to ensure it can withstand day-to-day use.
To paint your hardwood floors:
- Sand the surface of your floors with sandpaper.
- Clean the floor of any dust or debris.
- Using a brush or roller, apply a thin first coat of paint. Paint along the grain for best results.
- Allow 24 to 48 hours for the paint to dry.
- Sand the painted surface with sandpaper.
- Apply a second coat of paint, then go to a well-ventilated area.
- After applying and drying two or three coats, you could create designs or motifs on your floors.
- Apply an oil- or water-based polyurethane finish for areas with heavy foot traffic. You could also use paint with polyurethane in it to strengthen your floors.
Schedule an Appointment With 50Floor to Change the Color of Your Hardwood Floors
Our team at 50Floor allows you to choose hardwood flood colors in your own home. When you make an appointment with us, we bring flooring samples to your house. We offer one-year warranties on top of manufacturer warranties. If you want to change the color of your hardwood floors, schedule an appointment with us. You can also call us at 1-877-50-FLOOR.