


If you’ve long dreamed of having a finished basement, one that you can use as a recreation room, entertainment area or as an additional bedroom, now might be the perfect time to start planning a renovation and remodel. If you’re not sure where to start with your project, this checklist can help. It will guide you every step of the way, from figuring out how to pay for the project to putting the finishing touches on your completed basement.
Figure Out Financing
First, you’ll want to figure out how much you can afford to spend on your project and how you’ll cover the costs.
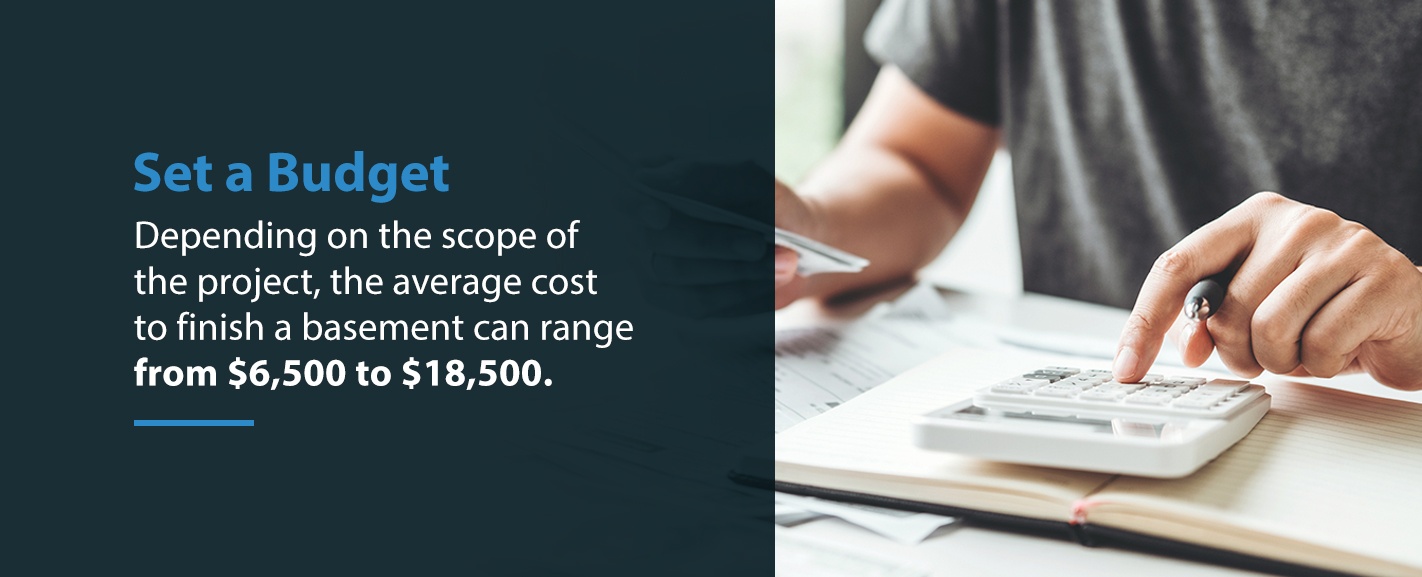
Set a Budget
There’s a wide range when it comes to the cost of remodeling a basement. How much your project will cost depends on the size of your basement and how much you want to do. How much work you do yourself versus how much you hire someone else to do also influences the overall cost.
Depending on the scope of the project, the average cost to finish a basement can range from $6,500 to $18,500. Remodeling the basement so it is liveable and usable can cost an additional $10,000 to $30,000.
You can use your home’s value as a guide when deciding how much to spend on your basement renovation. Usually, the cost to finish a basement shouldn’t be more than 20% of the value of your home. How long you plan on staying in the home also affects how much you should spend. If you plan on moving in a few years, it makes more sense to limit the cost of your project, as you won’t have much time to enjoy it and might not recoup the cost when you sell the house.
How to Pay for the Renovation
You have a few options for covering the costs of your basement project, depending on your current financial situation.
1. Pay in Cash
If you have savings set aside for major home improvement projects, it can make sense to pay for the basement renovation in cash. Using your savings is a good option if the cost of the project won’t completely drain your account and if you do not want to take on additional debt.
2. Use a Personal Loan
Another option is to apply for a personal loan and use the principal to cover the cost of your basement renovation. The terms of many personal loans often include fixed payments spread out over up to five years.
3. Tap Into Your Home’s Equity
Depending on how long you have lived in your home and how much of the mortgage you have paid off, you might have built up a considerable amount of equity. Equity is the value of your home minus the amount remaining on the mortgage. If your home is worth $250,000 and you have a $100,000 mortgage left, you have $150,000 worth of equity.
You might be able to borrow against that equity to pay for your basement project. You can take out a home equity loan, which is similar to a personal loan in that you get the amount in one lump sum and pay it back over several years.
Another way to access your home’s equity is to apply for a home equity line of credit (HELOC). A HELOC is a bit like a credit card for home renovation projects. You can borrow against your equity, pay back what you’ve borrowed and then borrow more if needed.
While you might get a lower rate on a home equity loan or HELOC compared to a personal loan, your home is the collateral on the loan, meaning you could lose your home if you borrow too much.
Schedule Inspections
Once you’ve figured out how much you spend and how you’ll pay for your project, the next step is to take a closer look at the basement to see what’s going on down there and what it might need.
1. Test for Moisture
Moisture can get into the basement in several ways. It can:
- Seep in from saturated soil around the home.
- Come from humid outside air.
- Come from humid air inside the home.
- Get in through air leaks.
Wet basements are common, and some estimate that up to 60% of basements have moisture problems.
To keep humidity and water from causing problems in a finished basement, it’s important to test for moisture before you do anything. A home inspector can check your basement for signs of moisture issues, such as marks on the walls and peeling paint. They can make recommendations for sealing the basement or otherwise reducing the moisture level.
2. Check the Foundation
Your home inspector should also take a close look at the foundation. They’ll let you know if they find any cracks or issues that are a cause for concern and can recommend steps to take fix the problem.
3. Schedule a Radon Test
Radon gas occurs naturally and is colorless and odorless. It often travels from the ground into homes through cracks in the foundation and can be found in high levels in homes across the U.S. Since radon can cause cancer, making sure there aren’t high levels of it in your basement is important before you begin a renovation project.
Home inspection companies often offer radon tests as an added service. You can also order a kit and perform the test on your own. If high radon levels are found — above 4 picocuries per liter — installing a radon mitigation system will help you keep your family safe.
Plan and Hire
After your basement has passed inspection or you’ve taken the steps to fix any issues uncovered by the inspection, the next step is to start planning.
1. Hire a Contractor
You can finish and renovate your basement on your own, but you might find that hiring a professional contractor makes the process go more smoothly. When you work with a professional, your project is more likely to get finished quickly. It will also be less stressful for you. A licensed contractor will understand the rules in your area, will work with you to get the proper permits and will help you hire others to handle specialized projects, such as electrical work and plumbing.

2. Get the Appropriate Permits
While not every home renovation project requires a permit, many do. It’s likely that your basement project will require you to apply for certain permits, particularly if you are making substantial changes or are installing new electrical features and plumbing. Your contractor can be a helpful resource when it comes to getting the appropriate permits.
3. Plan the Design
Once you have the logistics figured out, you can start focusing on the design of your basement. Keep these things in mind as you design the basement:
- The location of your home’s systems, such as the HVAC system, water heater and sump pump. You’ll need to plan around these, as moving them is often costly.
- What you want to use the basement for, such as an extra bedroom or recreation area.
- Features you want to install, such as a bathroom or kitchen.
4. Schedule a Clean-Out
If you use your basement for storage, there is probably a lot of stuff down there you don’t want to keep. Schedule a clean-out before major work gets started and have any junk or unwanted items hauled away.
5.Set up Wiring
Depending on your basement’s existing set-up and how you plan on using the basement going forward, you might need to install more wiring down there. Any electrical project is usually best left to a licensed electrician. Your general contractor might have a professional they usually work with and recommend. If not, you can ask friends and family for recommendations or look at online reviews to find someone who is highly recommended.
6. Hire a Plumber
If you plan on installing a bathroom in your basement or want to add in a wet bar or kitchen, you’ll likely need to install plumbing. Your contractor can provide recommendations or you can ask friends and family if they have a plumber they usually work with.
7. Add Waterproofing
If moisture is an issue in your basement, you might need to add waterproofing to keep water from coming in. Waterproofing efforts can involve sealing cracks in the foundation. If you don’t currently have one, it might be a good idea to install a sump pump to remove excess water from the basement.
8. Build and Frame Walls
After all the preparation work, it’s time for the first step that will make you feel like your basement finishing project is actually underway — building and framing the walls. Your contractor will most likely take care of this part of the process for you or will hire a carpenter to do the work. If you feel like getting hands-on with your project, you can ask to help out with this step.
8. Install Flooring
Once the walls are up, you can focus on what’s underfoot — the floor. Some types of flooring might be a better choice for a finished basement than others. For example, you might want to skip solid hardwood, as it is more costly and less water-resistant than other options. Good flooring picks for a basement include:
- Carpet
- Luxury Vinyl Tile
- Vinyl
- Laminate
- Engineered hardwood
50Floor can help you choose the flooring option that will work best in your basement, based on how you plan on using it. Contact us today to learn more.
9. Finish the Ceiling
Depending on the type and location of the pipes in your basement, you have a few options when it comes to installing the ceiling. If the pipes and ducts are below the joists, you’ll most likely need to install a drop ceiling to cover them and provide access to them if needed. Sheet paneling or drywall can work as a ceiling option if the ducts or pipes are flush with or located above the joists.
10. Add the Finishing Touches
The finishing touches on your basement renovation are all the little odds-and-ends that make your project complete. At this phase, you might focus on:
- Painting the walls
- Install fixtures and cabinets
- Choosing drawer pulls and knobs
- Hanging doors
- Adding furniture and electronics
- Hanging art and pictures
- Adding decorative objects
- Installing lighting
- Installing crown molding
- Dusting, vacuuming and cleaning up